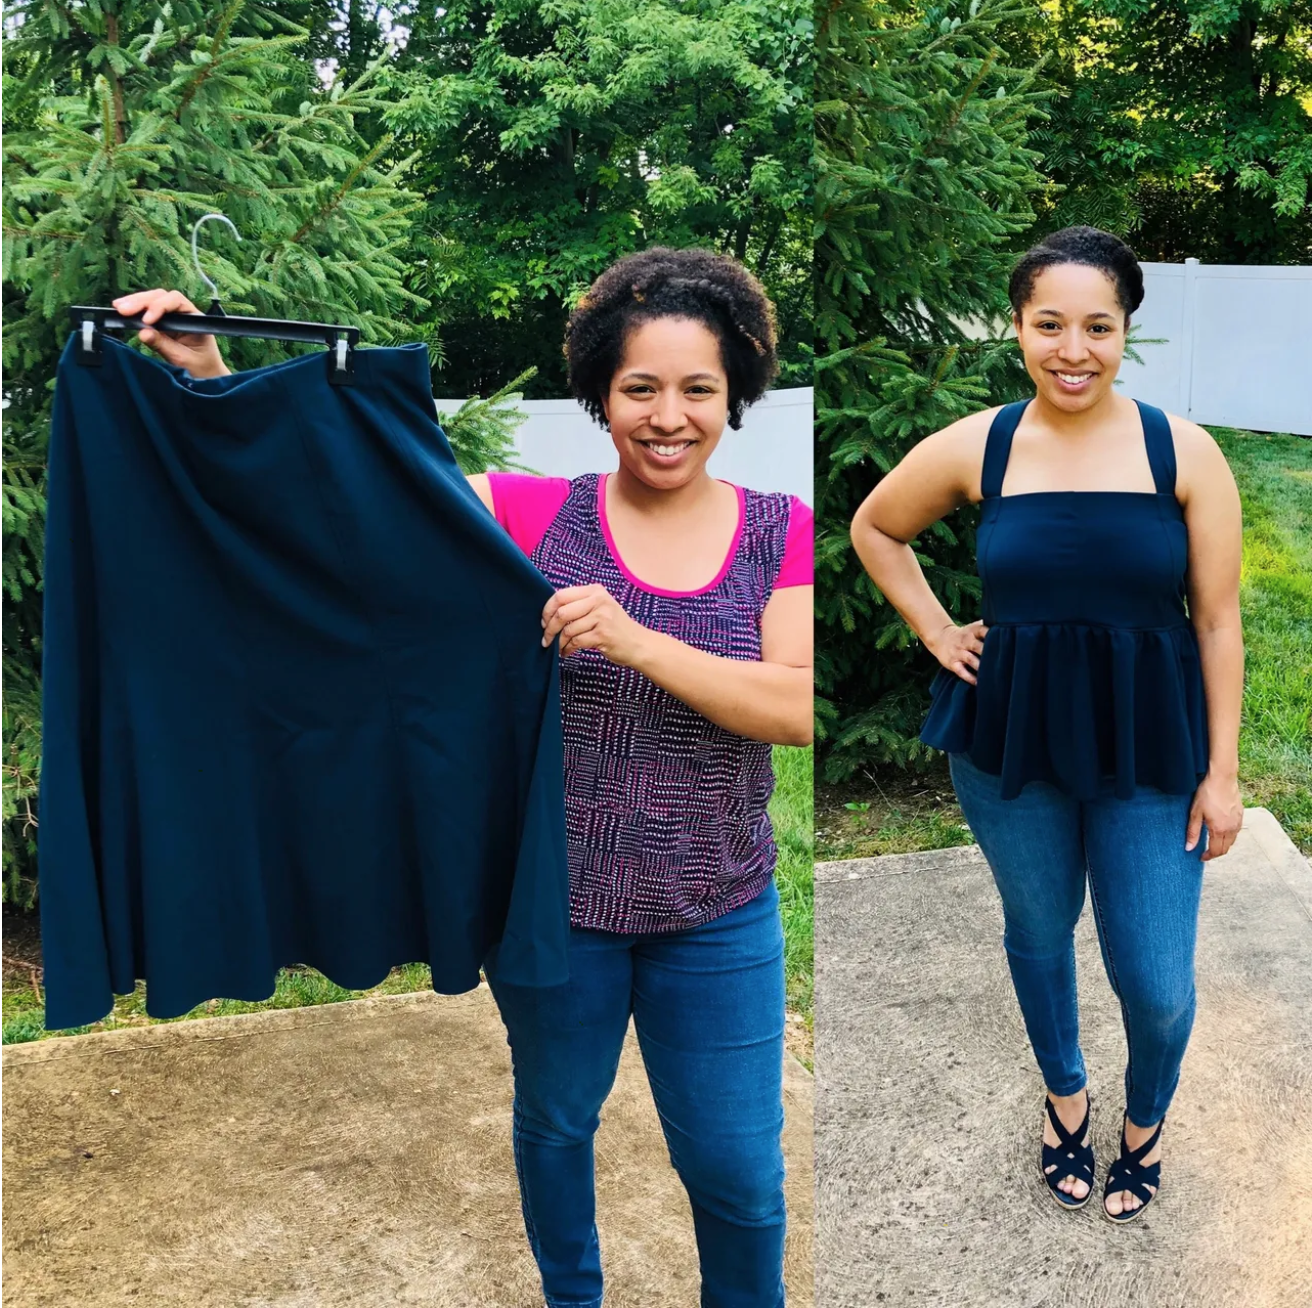
Flared Skirt to Peplum Top Transformation
I'm so happy to debut my latest refashion! I found this flared skirt at the thrift store and I just knew I could refashion it into something cute (not that it wasn’t cute as a skirt, but it was too big and the style wasn’t particularly flattering on me).
My first thought was to make a dress, which I think could have been cute, but I decided on a peplum top instead because I wanted to take advantage of the already hemmed bottom (yes, I hate hemming that much). The problem was that the skirt flared out at the bottom, so if I had left it as a dress, that extra fullness would have hit me in a weird spot, making me my hips look much wider. So I thought, let me shorten it and gather in some of this fullness. And honestly, my wardrobe is in need of more tops than dresses, so it was a pretty easy decision once I got a vision for what it would look like.
The process of transforming the skirt was fairly simple. I’m sorry I didn’t take pictures of the actual construction process. Sometimes I get in my creative work mode and forget about EVERYTHING else, but I’ll try to remember to snap some pictures next time, because I know it can be helpful for beginners to visualize the whole process.
Anyway, all I really did was put the skirt on (pulled up over my bust) then marked where I wanted the bodice to end (plus a little extra for seam allowance). Then I cut that away, put it on my dress form inside out and pinned out the excess until I liked the fit of the bodice. My dress form is a bit smaller than me, but the fabric had quite a bit of stretch (and I made sure not to pull it too tight on the form). I stitched where I pinned and cut away the excess. I later regretted cutting away the zipper because I ended up having serious struggles putting in a new one. But I’ll get to that later lol.
Next, I grabbed the bottom part of the skirt and decided how long I wanted the peplum to be. I kept the hem intact and cut the excess away from the raw edge side. I didn’t measure, just eyeballed it and the cut it parallel to the hem (following the curve). Then I sewed gathering stitches and pinned the gathered peplum to the bodice (matching up the seams). I stitched this in place.
I should have basted lol, because when I tried it on again, I realized that I wanted to shorten the bodice even more. But instead of seam ripping, I simply cut it off (leaving a few centimeters above the stitching line for seam allowance) and trimmed it down. Once I was satisfied, I was able to sew the peplum piece back on to the seam allowance I had left, thereby creating a little mini waistband, which I think is so cute! I love it when mistakes work out in my favor😊.
The next step was the zipper, so let’s talk about THAT fiasco lol. I've sewn in many a zipper since I started sewing, but for some reason it hasn't become second nature yet, and I still need instructions to follow each time. I decided to keep it simple and go with a standard zipper, and I followed a basic tutorial (available on BluPrint) that recommended using wash-away tape to hold the zipper in place. The tutorial itself was actually very useful, but LAWD I do NOT know what was up with my wash-away tape! I've used it before with no problems, but for some reason it just wasn't sticking properly this time! So when I started sewing the zipper down, it was just sliding all over the place and my stitches weren't catching the zipper at all! It took me 3 tries to finally get the zipper in and I ended up having to use pins to hold it in place. Not my finest hour, and not my best looking zipper insertion, but at the end of the day, the top is still cute and I'm definitely still gonna rock it.
The last step was the straps. Luckily, I had just enough skirt pieces left over to cut 2 straps. I used my rotary cutter to cut them into perfect rectangles and then I folded them in half (lengthwise) and stitched along the edge. Then I flipped them right side out, pressed them, and topstitched both sides close to the edge. The original skirt had elastic at the waist which was folded toward the inside. I left this intact, and I'm so glad I did because not only does it keep the bodice in place above my bust, it also allowed me to stitch the straps in securely using my machine, and the stitches aren't visible from the outside. I tacked the elastic down with a needle and thread (making sure not to go all the way through to the other side) and that's it! I'm so glad I decided to criss-cross the straps in the back because I think it adds such a cute detail to the top.
I styled it with skinny jeans and sandals and I think it's just perfect for summer. But thinking ahead to Fall, I think it also looks great layered under a cardigan.
Cost Breakdown:
I purchased the skirt from Savers for $7.99
I had the zipper and thread that I used already on hand. I don't know the exact price I paid, but I do know that I got both at a steep discount. So let's just say $2 for the zipper and thread.
That brings the total cost to $9.99 for this adorable top! Well, $9.99 plus a few hours of my time lol. Well worth it in my opinion ;)


