
My Me-Made Fall Collection 2024
First of all HEEEEEEEEY! Thanks for being here!
I wanted to share the results of a challenge I set for myself in 2024. I wanted to create a collection! Specifically, I wanted one week’s worth of outfits for myself that fit the following criteria:
The makes needed to fit my personal style.
They needed to also fit my lifestyle.
And they needed to be at least somewhat cohesive as a collection.
I decided not to pressure myself into drafting all of the pieces myself, because with my current skill level I knew I didn’t have the time for that, and for me, this project wasn’t about proving that I can draft patterns. It was about creating a wardrobe I love, in a time frame I can deal with, in as sustainable a way as possible, and within a budget that I can afford. So, this collection contains a mix of thrifted and me-made pieces. Each look has at least one item that was made (or modified) by me, whether I sewed it from scratch, used a pattern, refashioned a thrifted piece, crocheted it, or even just hand-dyed it. I also matched each look with what my schedule would most likely have me doing for each day of the week to ensure criteria number 2 was met.
A few other disclaimers before we get started. I am not a model, nor do I have a professional photographer. That said, please excuse the imperfect lighting in my photos. The weather was too nasty to go outside when most of these photos were taken. I just did the best I could since the sun didn’t seem to want to show her face at all.
With all that said, let’s jump into it! I hope you enjoy!!
Process:
To get started on this collection, I first chose my colors. I decided on brown and tan for my neutrals and deep green, red and burgundy for my colors. You will notice as you get into the collection that other colors were added in (black, olive green, gray). This is because I realized I actually didn’t have enough fabric in my original color choices, so I ended up having to pivot (I didn’t want to spend money on more fabric when I have so much usable fabric in my stash), and I’m not disappointed at all in the result :)
Anyway, once I had my colors chosen, I went to my fabric stash and pulled fabrics that matched my color choices and looked fall appropriate. From there I decided what type of clothing I wanted to wear each day of the week. I looked at the pieces I already own and decided on what I felt was missing in order to create a nice fall look. I then matched the missing clothing pieces to the fabrics and found suitable sewing patterns (or decided on an alternate method to create the piece, such as crocheting or refashioning).
Monday
Like most of you, Monday is a work day for me. I’m a teacher and I usually prefer to wear dresses or skirts to work. I know every school is different and some teachers are allowed to dress casually (I know I dressed casually when I taught elementary). But at my school, we have dress down days on Wednesdays, but otherwise are expected to dress professionally. And I don’t mind it because I’ve come to prefer wearing skirts and dresses over pants most of the time. However, when I was out thrifting one day, I came across this pair of forest green trousers and I absolutely loved the fit and color so I decided to base this look around those pants. I decided a button-down shirt would be the best option and I’d been holding onto a fun bold print for awhile so I decided it was finally time to use it! I made a few alterations to the pants as well. Originally they had tie straps on the ankles and I didn’t like how they looked on me, so I grabbed my seam ripper and removed them. There was also a tie belt, which I removed, but I kept it in my closet because I think it will make a nice headband for a different outfit.
Fabric:
Main Fabric: Brown and White Cotton Print - purchased secondhand at Savers Thrift
Collar and Button Placket: Tan Linen - purchased secondhand from City Sewing Room in St. Louis, MO.
Sleeves: Brown Stretch Woven Linen - from Minerva (I had some scraps left over from a previous project)
I love how all the fabrics work together to create a unique, yet cohesive design :)

Pattern:
McCall’s 7472 - This is my second time making this pattern. The construction is pretty easy as far as button-down shirts go. I particularly like the curved hemline. I did my best to pattern match the fabric and it turned out good, but not perfect. The design features faces that are oriented in both directions, so no matter which way I placed the pattern pieces I ended up with an upside down face somewhere. Oh well, I still like the shirt.
If I remember correctly, I didn’t make any modifications to the pattern except to shorten the length in the back waist.

Styling:
I decided to wear the shirt open this time (even though I think it looks great buttoned up as well). I happened to have a tank top that matches my boots and I thought that really pulled the look together. I also made my necklace, which is just some beads I threw on a leather chain, but I think it works. Realistically, I would probably wear flat shoes to work, but I just love it with the boots, so that’s how I’m choosing to show it off this time :)
Tuesday
On Tuesdays and Fridays I usually work from home. I try to get as much sewing done as possible on these days, so I like to be comfortable, but I also need to leave the house from time to time to take the dog out or run an errand, so I don’t want to just be in my PJs.
For this first “work from home” look, I opted for leggings and a sweater. I made the leggings back in 2023 (pattern is Simplicity 9636 by Mimi G) so the new piece for this collection is actually the sweater. It was a thrift store find that I picked up because it fit well, was 100% cotton and didn’t have any rips or stains. I only had one problem with it: the color. It was a shade of canary yellow that unfortunately does nothing for me. I looked washed out the second I put it on. I wish I had a picture of the original color and I’m almost positive I took one, but I can’t find it anywhere in my photos so you’ll just have to take my word for it.
Anyway, I decided to try dyeing it using Rit Fabric Dye. The plan was to dye it a forest green, but when it came out this shade of gray I loved it so much that I decided not to try again.

I don’t have a pattern or fabric to share with you for this look, but what I do have is some encouragement for you to try fabric dyeing out for yourself! Sewing skills aren’t needed (just follow the directions on the bottle) and it gives you the ability to grab thrifted pieces that may be in your size, but not your color. Since dyeing this sweater, I have dyed several other items and I just love how it refreshes my wardrobe!

Styling
Once again, realistically I would probably wear flat shoes with this outfit, but I wanted to show how you can easily dress up a simple look, just by adding boots and a pair of earrings. Matching the boots to my pants is a petite styling trick to help me look taller ;)
I’ve had the earrings forever, but they are still my faves. The handbag is something I whipped up a while back (no pattern used) and I used the same corduroy fabric to make a jacket for this collection which you’ll see if you keep scrolling on down :)

Oh and the sweater is actually hip length, but I used the elastic around the waist hack to create this faux tucked in look just so it doesn’t hit me at my widest point.
Wednesday
Wednesdays are usually dress down days at work, but I usually just wear jeans and school t-shirt on those days. So for this collection I decided to go ahead and create a professional look, since those are the outfits I need to put more thought into. For this one, the new piece is the floral top, but I also made the belt :)

Fabric:
The fabric is a light brown floral knit that I purchased secondhand from City Sewing Room in St. Louis. I love it!! It’s lightweight and has a good amount of stretch. And I have some left, so I’ll be thinking about what else to make out of it.

Pattern:
For this top, I made view A of Simplicity 8994 by Mimi G. I love her patterns because they always come with sew along videos :)
This top was a quick and easy sew and what I love about it is the boat neckline. It’s finished with a facing, but you could also opt to line it instead.

Styling:
I opted for a fitted rib knit skirt in a burnt orange color. I think it goes well with the floral print. My shoes are cream colored loafers (sorry you can’t see them in the pics) that match well with my belt. I posted about the belt on my IG at some point. It’s made out of twill tape, interfacing and left over parts from a purse that was falling apart. It’s one of my favorite belts. And I decided to go with the same handbag as Tuesday’s look.
Thursday
For this look, the new piece is the skirt. I made the vest as part of a vintage sewing pattern challenge hosted by Rochelle of @rochelle.handmade.designs back in 2023. I love the vest, but I don’t wear it as often as I would like because the skirt that I like to wear with it is too short for work. So the mission for this look was to create a work appropriate skirt to wear with this vest. A secondary goal was to save time and money and I think I nailed it because this project took about a half hour to complete and cost less than 5 dollars!! How is that possible? The answer is a ROUND TABLECLOTH. I found the perfect one at the thrift store and did a quick refashion project to create this look.

Tablecloth Skirt Tutorial!
Interested in making your own tablecloth skirt? Click here for a photo tutorial :) Just a few basic sewing skills are needed and the best part is that if you like the length of your tablecloth you don’t have to hem it because it’s already been done for you!

Styling:
I decided to go with a white fitted tee underneath the vest and my dress shoes with gold details. I can’t remember where I bought them, but I’ve had them for years and they’re still in great shape. My bag is a tote that I made in summer 2024 out of a placemat, some faux leather scraps, and the same corduroy fabric as the other bag I’m rocking in this collection.

Monochrome for the win!
As someone who is 5’1” (1.55 meters for those not in U.S.) wearing the same color from head to toe is another great styling trick to add the illusion of height. I love that I get to use this styling hack in fun colors and not just black or other neutrals.
Friday
Friday is another work from home day for me, so I wanted something comfortable. I’ve been wanting to make a hoodie and decided this was the perfect time to do it. Navy wasn’t one of the original colors that I had planned for this collection, but it was the only knit fabric that I had enough of that would work for this type of project, so I decided to go with it.

Fabric:
Main Fabric: French Terry - purchased secondhand from City Sewing Room in St. Louis
Lining for hood: Polyester Satin - also purchased secondhand from City Sewing Room.
I’m pretty sure the ribbing for the cuffs and hem band came from JoAnn, but I bought it years ago, so I have no idea if it’s still available.

Pattern:
I used KnowMe pattern number 2080 to make this hoodie. Click here to read my review.
I made a few modifications to the pattern so I could have it just how I wanted it. I shortened to bodice and sleeves for a better fit. I also used a smaller cuff than is recommended because my wrists are smaller than average. To protect my hair, I added a satin lining to the hood (iykyk ;)
Next, I opted to use grommets instead of making buttonholes for the drawstring (which I hadn’t inserted yet at the time these photos were taken lol). I didn’t have a drawstring in the correct color, but then I remembered I know how to crochet lol, so I grabbed some blue yarn and made a crochet cord to use as a drawstring. Worked like a charm!

Styling:
I’m wearing this hoodie with one of my most comfortable skirts. It’s actually a refashion of mine from a long time ago. It was a thrifted maxi length skirt that I shortened. I used the fabric that I cut off to create the pockets on the front of the skirt.
I also made my top forever ago using a basic knit dress pattern (sorry I can’t remember the pattern number)
My shoes are thrifted, but slightly too big so they’ve now found a new home in my mom’s closet :)
Saturday
Hooray for the weekend! On Saturdays I sometimes like to go thrifting, maybe have a date night with my husband, or (and you can probably guess) SEW!
The piece that I made for my Saturday look was the second most time consuming piece out of the whole collection, but it was 100% worth it. I made a lined jacket with a statement collar.

Fabric:
Front and sleeves: Brown corduroy
Back and collar: Multicolored corduroy
Cuffs and hem band: Black cotton ribbing harvested from a thrifted dress
Unfortunately, I can’t remember where I purchased any of these fabrics, but they were definitely secondhand.

Pattern:
This is view C of Simplicity 8994 by Mimi G. I followed along with Brittany J Jones who created the video tutorial for this jacket. I made my usual length changes (shortening for my height). I also drafted my own pockets because I didn’t want pocket flaps like the pattern called for (and I just really don’t like when you have to awkwardly put your hands into top-opening pockets on a jacket). I wanted the openings to be on the side, so I went off script and did my own thing. My pockets turned out huge, but ‘m not mad at them :)
I found the pattern pretty easy to sew, the only part that really gave me trouble was the corners where the ribbing gets attached to the main fabric. Is it perfect? No, but I love my new jacket regardless!!
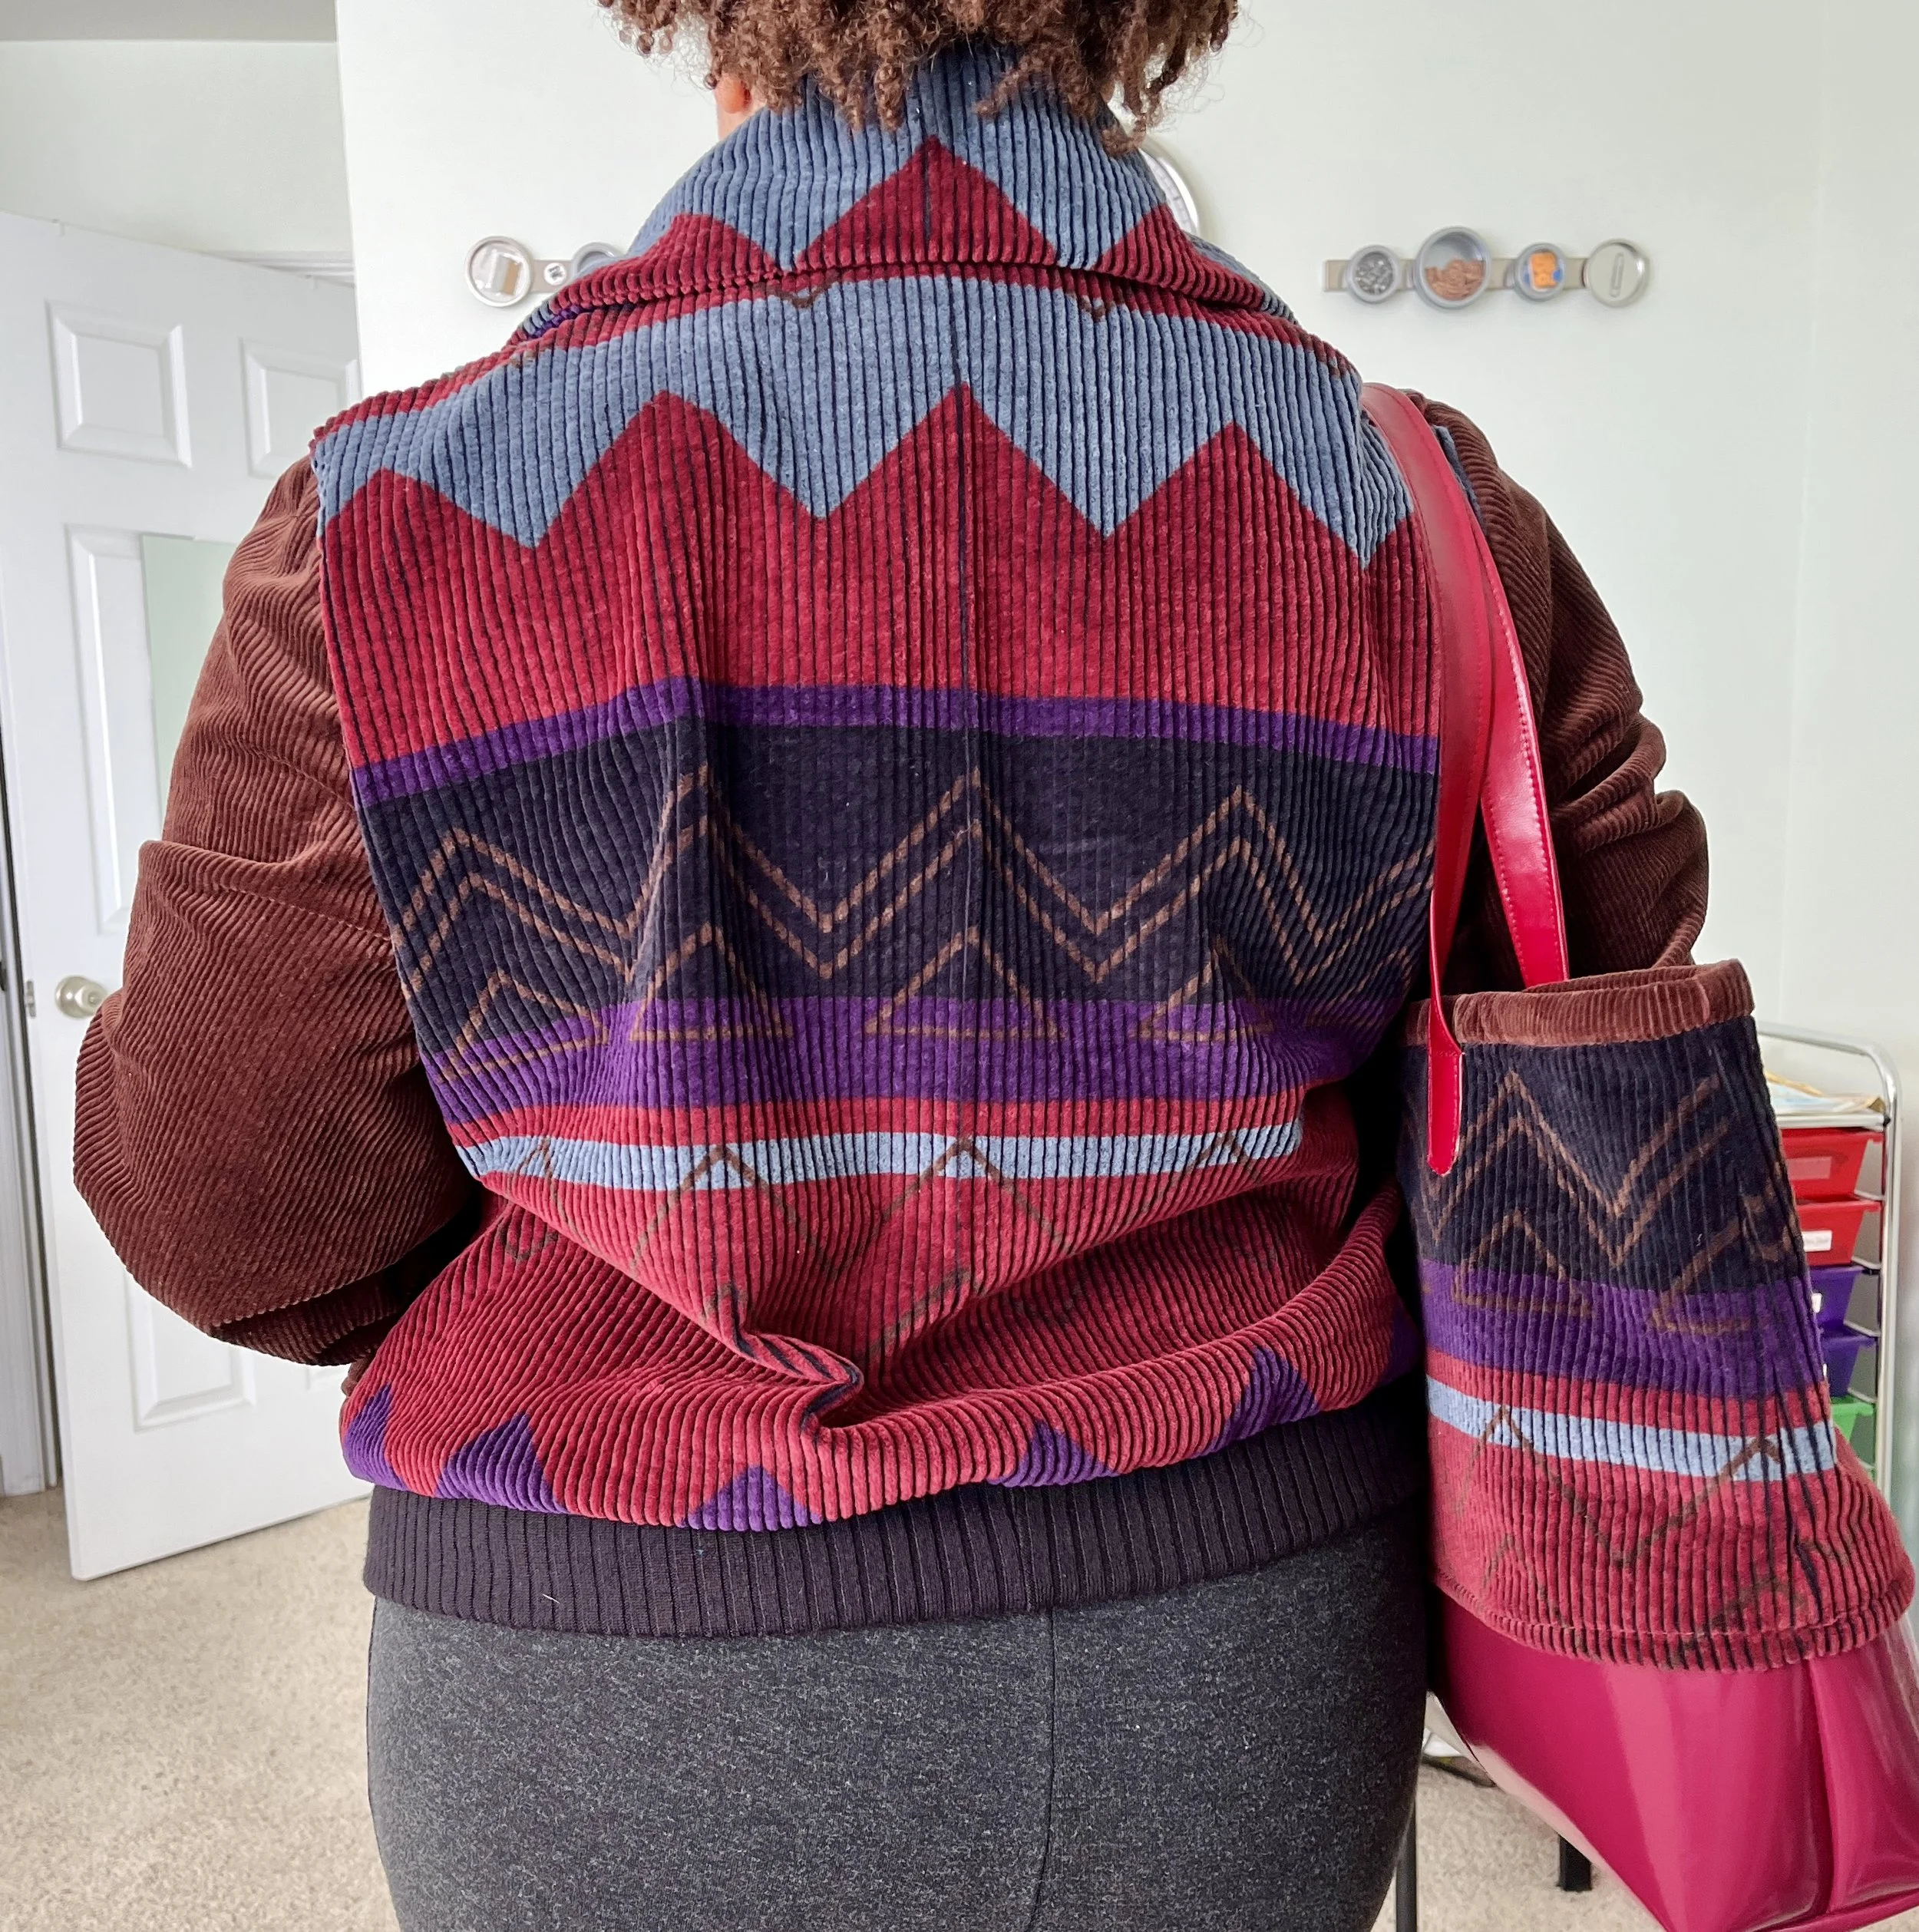
Back view
I love how well the jacket matches with my bag. This is why I hold onto my fabric remnants. You never know when a matching set idea will come to you!

Styling
I tried out a few styling options with this jacket and I like the versatility of it. I think I prefer it with leggings and booties, but I’m not mad at with a skirt either!
Sunday
Well folks, we’ve reached the final day of my fall collection so I can now reveal the piece that took the most time out of everything that I made. It is the only crochet piece in my collection, and while I love ALL of the pieces that I created, this one is my favorite. I’ve known how to crochet since I was young and I picked up knitting in my 20s, but I’m still relatively new to making full on clothing pieces with yarn and I’ve been a bit intimidated to crochet my own clothes. This is my second time crocheting a top from start to finish and it’s really helped build my confidence that I, in fact, CAN do this. I’ve already got more crochet projects planned for 2025 so stay tuned!

Pattern:
This crochet pattern is the Everyday Crochet Pullover Top by KnitcroAddict. You can get the pattern for free on her blog or you can purchase a more user friendly option from her Etsy shop. I followed along with the youtube video and made the following minor changes:
I did not complete as many rows as recommended for the sleeves because I wanted them shorter.
I added ribbing to the bottom
I made a little bow for a decorative touch. It’s removable, so I can take it off if it doesn’t go with my outfit.

Yarn
I used K + C Botanical Yarn in black and olive green. It’s 70% bamboo viscose and 30% cotton and I purchased it at JoAnn.

Styling
To pair with this top, I opted for a black wrap skirt. This one is Simplicity 8606 and I made it a few summers ago.
I’m still on the fence about the boots. I like these olive green ones that I thrifted, but the color isn’t quite the same as the green in the top. And they don’t have a heel so I feel like I look extra short.

When I wear my black boots I like that I pretty much get an unbroken line from where the black color starts on the top all the way down to my feet. Plus these boots have a heel so I feel taller.
But anyway, footwear aside, I can see myself wearing this top with a variety of different bottoms so I can’t wait to try out more possibilities!
If you made it this far, please accept my heartfelt thanks!! I appreciate you taking the time to read about each of the pieces that I made and I hope that you leave inspired to have some fun with your own wardrobe! Whether it be to refashion something, dye something or make something from scratch, I hope I was able to help you find ways save money and/or make your wardrobe more sustainable. I hope you feel inspired to make your wardrobe work for YOU, because you’re the one who needs to feel good in the clothes you wear :)
Whatever aspect of fashion brought you to my blog, I wish you the absolute BEST time doing it in the new year!
Happy sewing! Happy crocheting! Happy designing! Happy styling!
Sincerely,
Sarah @learningsewmuch